Quality Rules Builder
Learn how to build and manage data quality rules in Autonify. Define rules to validate what type of data should exist within specific columns and tables, either manually or using AI-powered automatic rule generation.
📹 Building Data Quality Rules
Discover how to create quality rules manually and automatically using AI to ensure data integrity across your databases.
Understanding Data Quality Rules
Data quality rules define validation criteria for your data:
- Column Validation: Rules that apply to specific columns
- Table-Level Rules: Validations across entire tables
- Data Type Constraints: Ensure correct data types
- Business Logic: Enforce business-specific requirements
Accessing Quality Rules
Navigation Path
- Navigate to your data source
- Click on Agents in the sidebar
- Find the Data Quality agent card in Connected Agents
- Click View button to open the agent page
- The page shows three tabs:
- Dashboard (default)
- Rules
- Results
- Click the Rules tab
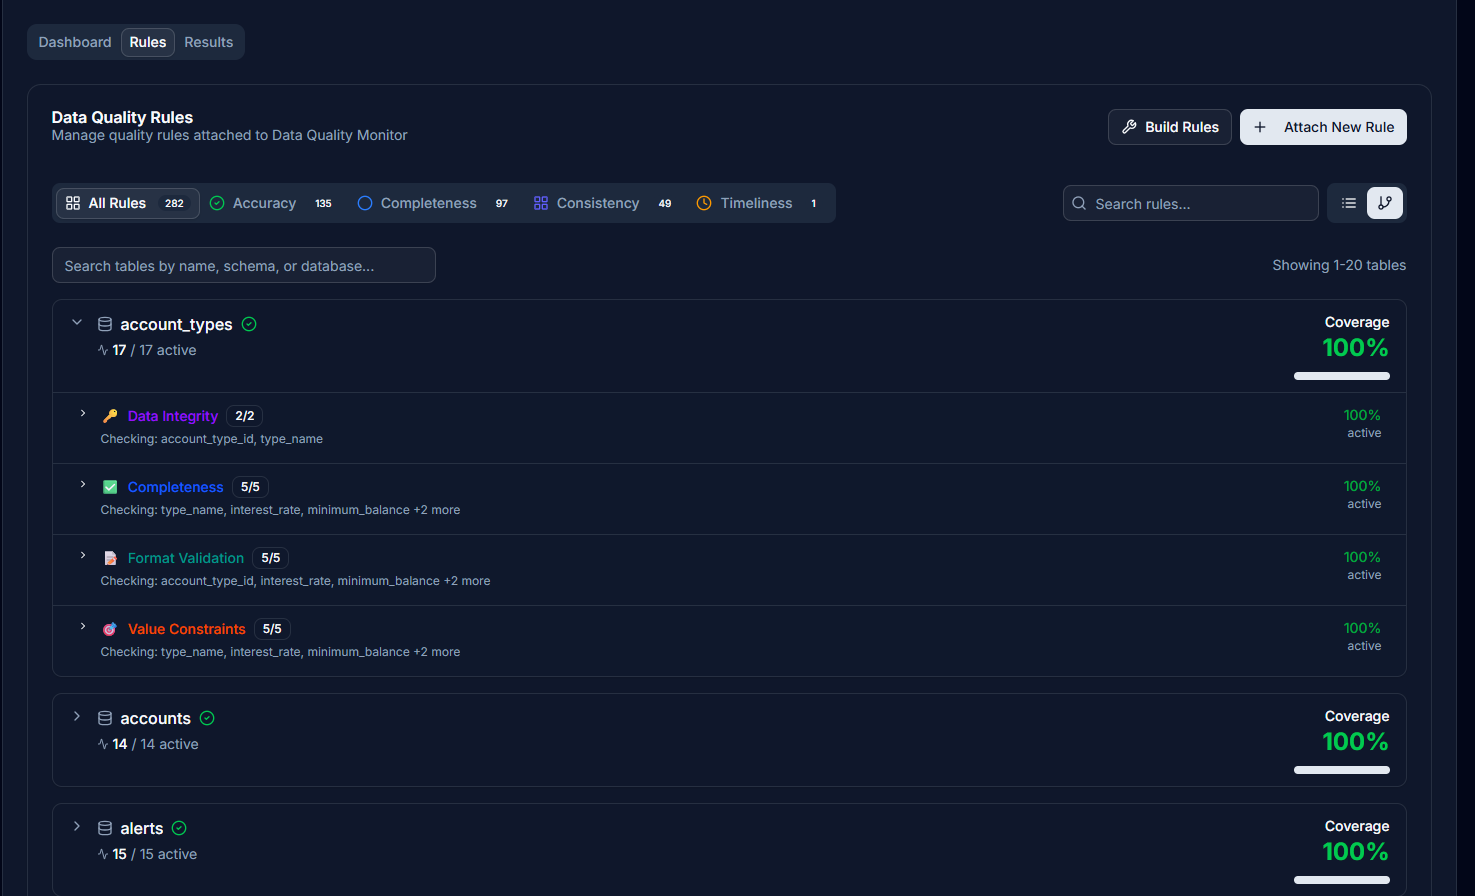
Interface Overview
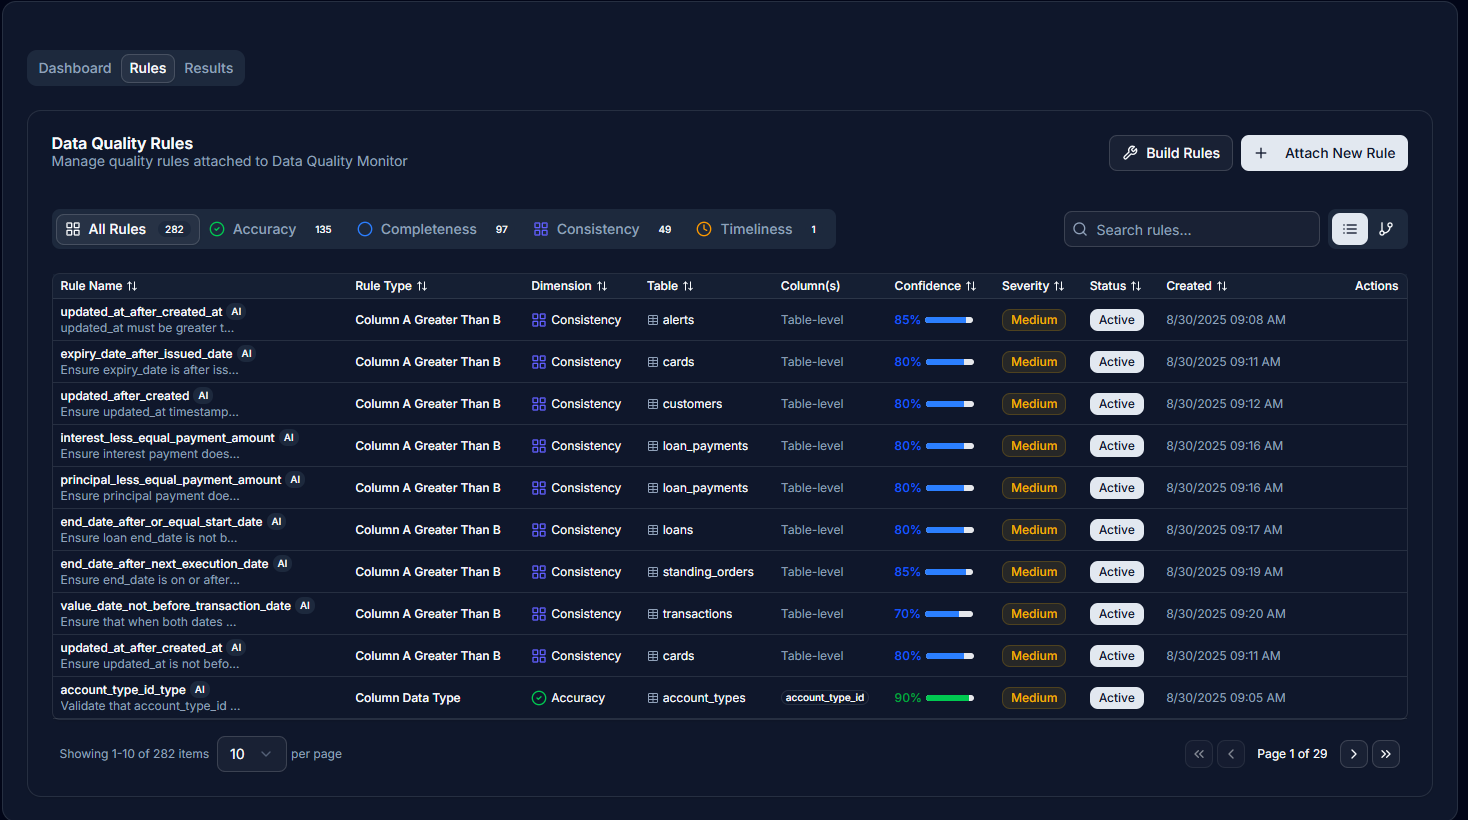
The Rules tab displays:
- Card Header: "Data Quality Rules" with description "Manage quality rules attached to [DataSourceName]"
- Action Buttons (top-right):
- Build Rules button (wrench icon, text: "Build Rules")
- Attach New Rule button (plus icon, text: "Attach New Rule")
Below the card header:
- Tabs:
- "All Rules" (with LayoutGrid icon and count badge)
- "AI Rule Suggestions" (appears when AI suggestions pending, with AlertCircle icon and notification badge)
- Dimension tabs for each quality dimension
- Right side controls:
- Search bar with "Search rules..." placeholder
- View toggle buttons in grouped container:
- List view button (List icon)
- Hierarchical view button (GitBranch icon, selected by default)
Creating Rules Manually
Attach Rule Dialog
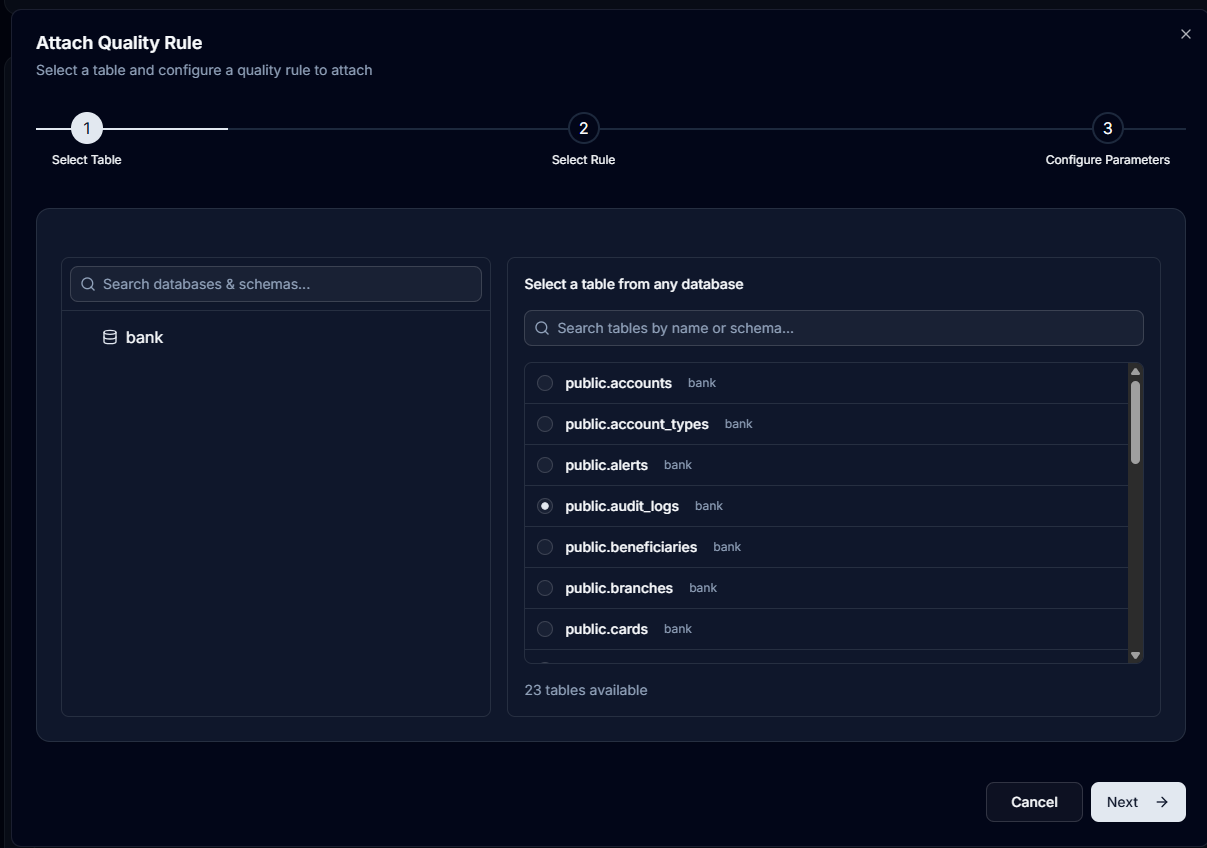
Click the Attach New Rule button (shows plus icon) to open a 3-step dialog:
Dialog Header
- Title: "Attach Quality Rule"
- Description: "Select a table and configure a quality rule to attach"
- Step Indicator: Visual progress with circles and labels:
- Step 1: "Select Table"
- Step 2: "Select Rule"
- Step 3: "Configure Parameters"
Step 1: Table Selection
- Database: Select from dropdown
- Schema: Select from dropdown (populated after database selection)
- Tables: List view showing available tables
- Navigation buttons:
- Cancel (bottom-left)
- Next → (bottom-right, disabled until table selected)
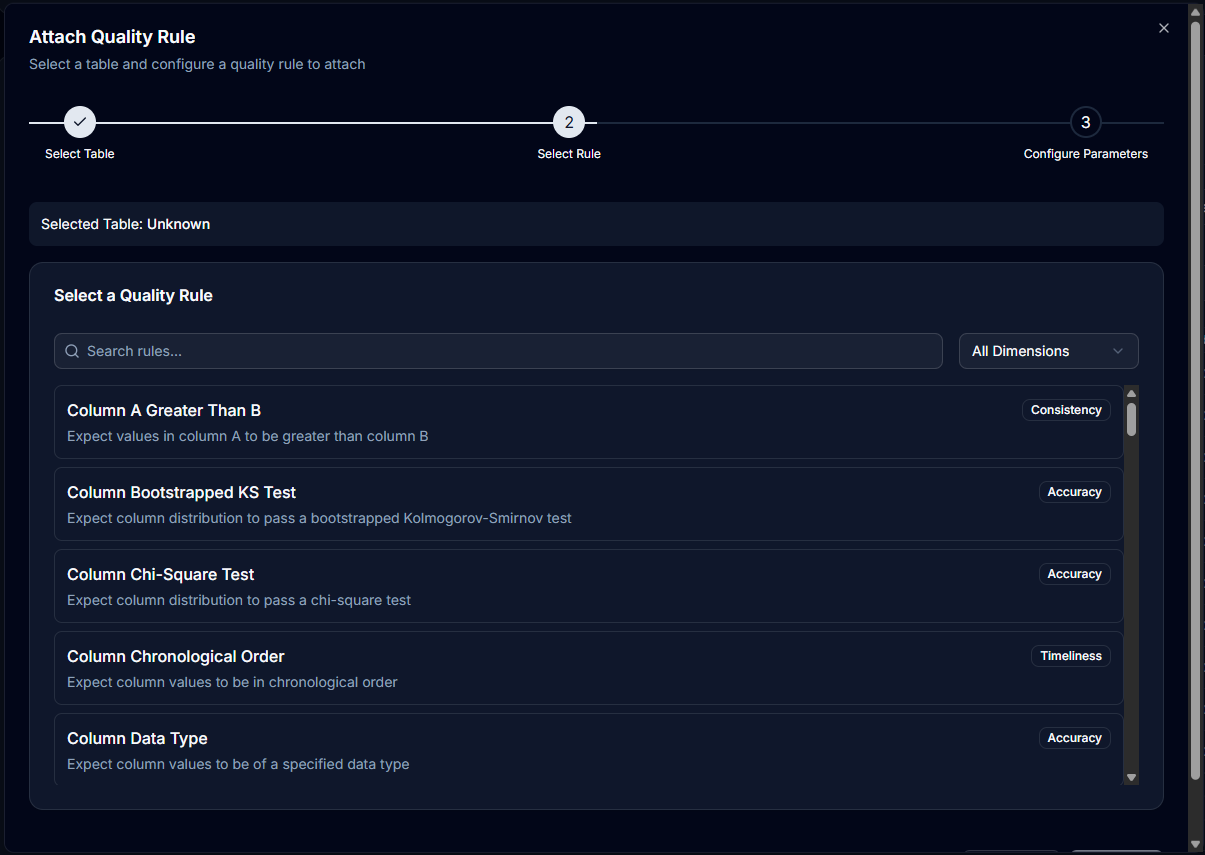
Step 2: Rule Selection
Choose from available rules:
- Search Bar: Filter rules by name
- Dimension Filter: Dropdown to filter by category (All, or specific dimensions)
- Rules List: Scrollable list of available rules
- Each rule shows:
- Rule name
- Dimension badge
- Description
- Navigation buttons:
- ← Back (bottom-left)
- Next → (bottom-right, disabled until rule selected)
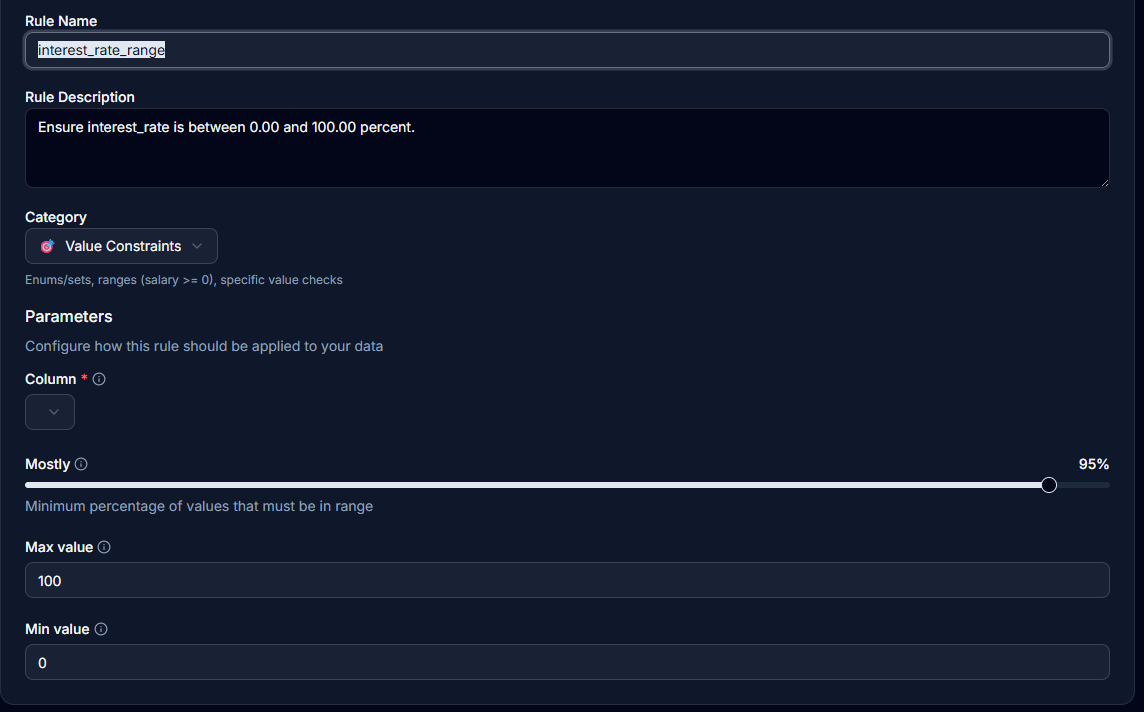
Step 3: Parameter Configuration
Configure rule-specific parameters based on selected rule:
- Dynamic Form Fields: Varies by rule type
- Common fields include:
- Column selection dropdown
- Value inputs (min/max for ranges)
- Pattern input (for regex rules)
- Data type selection
- Navigation buttons:
- ← Back (bottom-left)
- Attach Rule (bottom-right)
AI-Powered Rule Generation
Build Rules with AI
The AI agent automatically generates rules by analysing your data:
- Click the Build Rules button
- Button shows "Starting..." while initiating
- Progress dialog opens showing agent execution
- Agent analyses metadata and data profiling
- Generates rules in four main categories:
- Value Constraints
- Format Validations
- Completeness
- Data Integrity
- Rules appear in "AI Rule Suggestions" tab when complete
- Review and activate suggested rules individually or in bulk
AI Rule Categories
Value Constraints
- Length restrictions
- Allowed value sets
- Range boundaries
- Data type constraints
Example: Account balance must be between 0 and 1,000,000
Format Validations
- Pattern matching
- Regular expressions
- Standard formats
Example: Currency codes must be 3 letters (USD, GBP, EUR)
Completeness
- Not null validations
- Required field checks
- Mandatory relationships
Example: Customer ID cannot be null
Data Integrity
- Primary key uniqueness
- Foreign key relationships
- Referential integrity
Example: All account IDs must be unique
AI Rule Suggestions Tab
When AI generates rules, they appear in a dedicated tab:
Tab Features
- Badge: Shows count of pending suggestions
- Bulk Actions:
- Activate all suggestions
- Dismiss all suggestions
- Select individual rules to activate/dismiss
- Rule Status: Shows as "Pending" until reviewed
Managing Suggestions
- Review each suggested rule
- Activate to add to your active rules
- Dismiss to reject the suggestion
- Once processed, rules move to "All Rules" tab
View Modes
Hierarchical View
The default view organises rules by category:
├── Value Constraints
│   ├── Balance Range Check
│   └── Transaction Limit
├── Format Validations
│   ├── Currency Format
│   └── Account Number Pattern
├── Completeness
│   └── Required Fields
└── Data Integrity
    └── Unique IDs
Features:
- Expandable/collapsible categories
- Category counts shown
- Colour-coded by dimension
- Quick overview of rule distribution
Flat List View
Alternative view showing all rules in a single list:
- Table name
- Column name
- Rule name
- Dimension
- Status
- Actions (Edit/Delete)
Useful for:
- Searching across all rules
- Bulk operations
- Detailed rule review
Rule Examples
Currency Format Rule
Type: Format Validation
Pattern: ^[A-Z]{3}$
Description: Currency codes must be exactly 3 uppercase letters
Examples: USD, EUR, GBP
Balance Range Rule
Type: Value Constraint
Column: account_balance
Minimum: 0
Maximum: 1000000
Description: Account balance must be within valid range
Customer ID Not Null
Type: Completeness
Column: customer_id
Constraint: NOT NULL
Description: Every record must have a customer ID
Managing Rules
Editing Rules
- Click the edit icon (pencil) on any rule
- Opens "Edit Quality Rule" dialog
- Title: "Edit Quality Rule"
- Description: "Modify the configuration for this quality rule"
- No step indicator shown (goes directly to parameter configuration)
- Modify parameters as needed
- Click Update Rule button to save changes
Deleting Rules
- Click the delete icon on a rule
- Confirm deletion in dialog
- Rule is removed from data source
Bulk Operations
In flat list view:
- Select multiple rules with checkboxes
- Apply bulk actions
- Enable/disable multiple rules
Rule Status
Rules can have different statuses:
- Active: Currently being validated
- Inactive: Disabled but not deleted
- Pending: Awaiting configuration
- Failed: Error in rule definition
Best Practices
Start with AI Generation
- Run Build Rules first
- Review generated rules
- Adjust parameters as needed
- Add custom rules for specific needs
Rule Organisation
- Use clear, descriptive names
- Group related rules
- Document business logic
- Regular review and updates
Performance Considerations
- Avoid overly complex regex patterns
- Limit number of active rules
- Schedule validation during off-peak
- Monitor execution time
Common Rule Types
Data Type Validation
- Integer only
- Decimal precision
- Date formats
- Boolean values
Business Rules
- Value within business range
- Status in allowed list
- Date not in future
- Percentage between 0-100
Referential Integrity
- Foreign key exists
- Parent record present
- Cascade delete rules
- Orphan record checks
Pattern Matching
- Email format
- Phone numbers
- Postal codes
- Account numbers
Integration with Other Features
Data Profiling
- Rules informed by profiling results
- Automatic threshold detection
- Anomaly-based rule suggestions
Quality Dashboard
- Rule execution results
- Pass/fail metrics
- Trend analysis
Alerts and Monitoring
- Notification on rule failures
- Scheduled validations
- Quality score tracking
Troubleshooting
Rule Not Executing
- Check rule is active
- Verify column exists
- Confirm data type match
- Review error logs
False Positives
- Adjust rule parameters
- Review sample failures
- Consider data variations
- Update regex patterns
Performance Issues
- Simplify complex rules
- Index validated columns
- Batch rule execution
- Optimise queries
Next Steps
After building your quality rules: