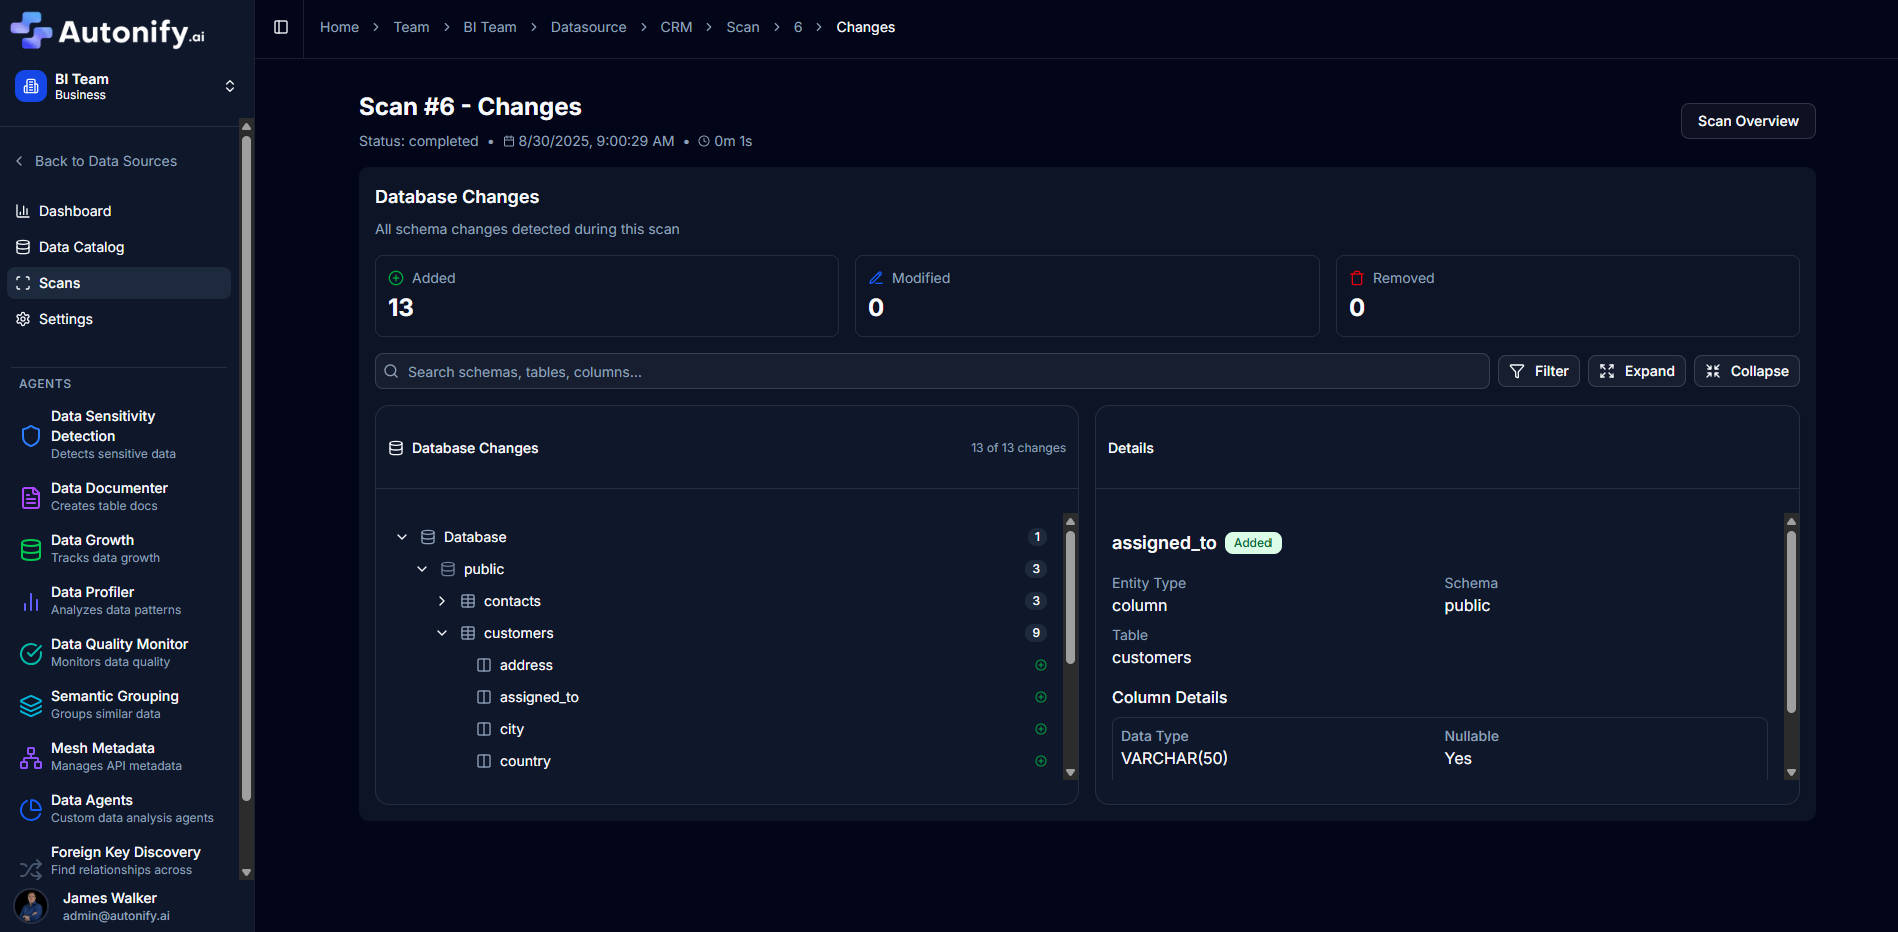
Database Changes Tracking
Learn how to track database metadata changes over time as your applications evolve. Autonify maintains a complete history of schema modifications, allowing you to monitor additions, modifications, and deletions across your data sources.
📹 Tracking Database Changes Over Time
Discover how to monitor metadata changes, view scan history, and track schema evolution in your databases.
Understanding Change Tracking
Autonify automatically tracks database schema changes by comparing each scan with the previous one:
- Automatic Detection: Every scan compares against the last successful scan
- Complete History: All changes are preserved for audit and analysis
- Schema Evolution: Track how your database structure evolves over time
- Zero Data Access: Only metadata is tracked, never actual data content
Scan History Overview
Viewing Scan History
Navigate to your data source and access the scan history:
- Open your data source from the team dashboard
- View the scan history table showing all previous scans
- Each scan displays status, duration, and trigger information

Scan Status Types
- Completed: Scan finished successfully with or without changes
- Duplicate: No changes detected since the last scan
- In Progress: Currently scanning
- Failed: Scan encountered errors
- Queued: Waiting to start
- Cancelled: Scan was cancelled
Managing Duplicate Scans
Duplicate scans indicate no schema changes were detected:
- Hidden by default to reduce clutter
- Toggle between "Show duplicates" and "Hide duplicates"
- Useful for confirming schema stability
- Indicates your database structure is unchanged

Viewing Changes
Accessing Change Details
To view what changed in a scan:
- Click View Details on any completed scan in the scan history
- This opens the scan overview page showing:
- Scan status, timestamp, and duration
- Scan type (Full or as specified)
- Triggered by (System or user)
- Database and table counts
- Click the Changes button to view all modifications
- The changes page displays modifications hierarchically by database and schema
Change Categories
Autonify tracks three types of changes:
Added Elements
- New tables created
- New columns added to existing tables
- New constraints or indexes
- New schemas or databases
Modified Elements
- Column data type changes
- Nullability modifications
- Default value updates
- Constraint definition changes
Removed Elements
- Deleted tables
- Removed columns
- Dropped constraints or indexes
- Removed schemas

Change Details Interface
Breaking Changes Alert
When breaking changes are detected:
- Alert appears at the top of the changes view
- Shows count of breaking changes by impact level (high, medium, low)
- Expandable list of specific breaking changes
- Click on a breaking change to navigate directly to it
Hierarchical Tree View
The changes are displayed in an expandable tree structure:
- Database Level: Top-level organisation
- Schema Level: Groups changes by schema
- Table Level: Shows table-specific changes
- Column Level: Individual column modifications
Exploring Changes
Navigate through detected changes:
- Click expand arrows to drill down into specific changes
- Select any element to view detailed change information
- Review exact specifications of what was added, modified, or removed
- See complete metadata for new elements
Filtering and Navigation
Tools to navigate and filter changes:
Search Bar
- Search for specific schemas, tables, or columns by name
- Filters results in real-time as you type
Filter Dropdown
Access via the Filter button to toggle:
- Added: Show/hide newly added elements
- Modified: Show/hide modified elements
- Removed: Show/hide removed elements
- Breaking Changes Only: Show only breaking changes
View Controls
- Expand: Expand all nodes in the tree
- Collapse: Collapse all nodes in the tree

Change Details Panel
When selecting a specific change:
- Element Type: Table, column, constraint, etc.
- Change Type: Added, modified, or removed
- Specifications: Complete metadata details
- Timestamps: When the change was detected
Large Change Sets
For scans with many changes:
- Maximum of 1,000 changes displayed at once
- Warning message appears for larger change sets
- Use filters to find specific items
- Search to locate particular tables or columns
Understanding Scan Results
First Scan
The initial scan establishes your baseline:
- All discovered elements marked as "Added"
- Creates the foundation for future comparisons
- Captures complete schema structure
Subsequent Scans
Each following scan:
- Compares against the previous successful scan
- Reports only actual changes
- Maintains change history for tracking
No Changes Detected
When a scan finds no differences:
- Displays "No Changes Detected" message
- Explains that database schema remains unchanged
- Still provides "View Changes Details" button for review
Change Metrics
Each scan summary shows:
- Total elements added
- Total elements modified
- Total elements removed
- Overall change count

Practical Use Cases
Development Tracking
- Monitor schema changes during development
- Verify deployments completed successfully
- Track feature implementation progress
Change Auditing
- Maintain compliance with change records
- Document when modifications occurred
- Identify who triggered each scan
Impact Analysis
- Understand schema evolution patterns
- Identify frequently changing areas
- Plan maintenance windows
Troubleshooting
- Detect unexpected schema changes
- Verify migration success
- Identify missing or incorrect changes
Scan Scheduling
While scans can be triggered manually:
- Manual Scans: On-demand via "Start New Scan"
- Scheduled Scans: Automated regular scanning
- Post-Deployment: After database migrations
Best Practices
Regular Scanning
- Scan after each deployment
- Schedule regular scans for production
- More frequent scans during active development
Change Review
- Review changes after deployments
- Investigate unexpected modifications
- Document significant changes
Duplicate Management
- Keep duplicates hidden for cleaner view
- Show when verifying stability
- Use to confirm no unintended changes
Interpreting Results
No Changes (Duplicate)
- Schema is stable and unchanged
- Good sign for production systems
- Expected between deployments
Many Changes
- Active development or migration
- Review carefully for accuracy
- Verify all changes are intentional
Unexpected Changes
- Investigate immediately
- May indicate unauthorised modifications
- Check with development team
Next Steps
After understanding change tracking: